What this tool is
With Mercuryo Statements, you can turn a raw bank or exchange statement into a file that's ready to upload to Microsoft Dynamics 365. Rules label every line the tool recognises. You review the lines it doesn't. One click produces the fixed 25-column workbook accounting expects.
When you label a payment, you can save that decision as a rule. From then on, every statement that contains that payment labels itself — a decision made once is never made again.
Note: All examples and screenshots in this guide use fictional demo data — invented companies, vendors and amounts such as "MoneyTea Ltd", "Nordwind Consulting OÜ" or "Bybit". Your screens will show your real data.
Get access
- Open the tool and click Register with your mercuryo.io email. Only @mercuryo.io addresses can register. The password needs at least 8 characters.
- Wait for approval. An admin approves your account in Admin Panel → Team Access and assigns your role.
- Log in as usual.
Each account has one of three roles:
| Role | What it can do |
|---|---|
| viewer | See everything and download exports. No changes. |
| user | Day-to-day work: upload statements, label lines, create rules, manage accounts. New rules wait for an admin's approval. |
| admin | Everything above, plus approving people and rules, deleting data, format settings and backups. Admin rules take effect immediately. |
To change your password, choose Account → My Account in the top-right corner.
The main page at a glance

The header shows the whole workflow as a map: Reference Data → Bank Accounts → Intercompany → Create New Rule → Rules → New Statement → Review → Export. Click any step to jump to it.
Review and Export stay dimmed until you open a statement. After that, the dot next to Review is amber while lines still need your attention, and green when everything is resolved.
Your daily routine is three steps: upload → review → export. Reference data and rules are occasional maintenance, not everyday work.
In the top-right corner: the light/dark theme toggle, the Admin Panel menu (admins only) and the Account menu.
Reference Data
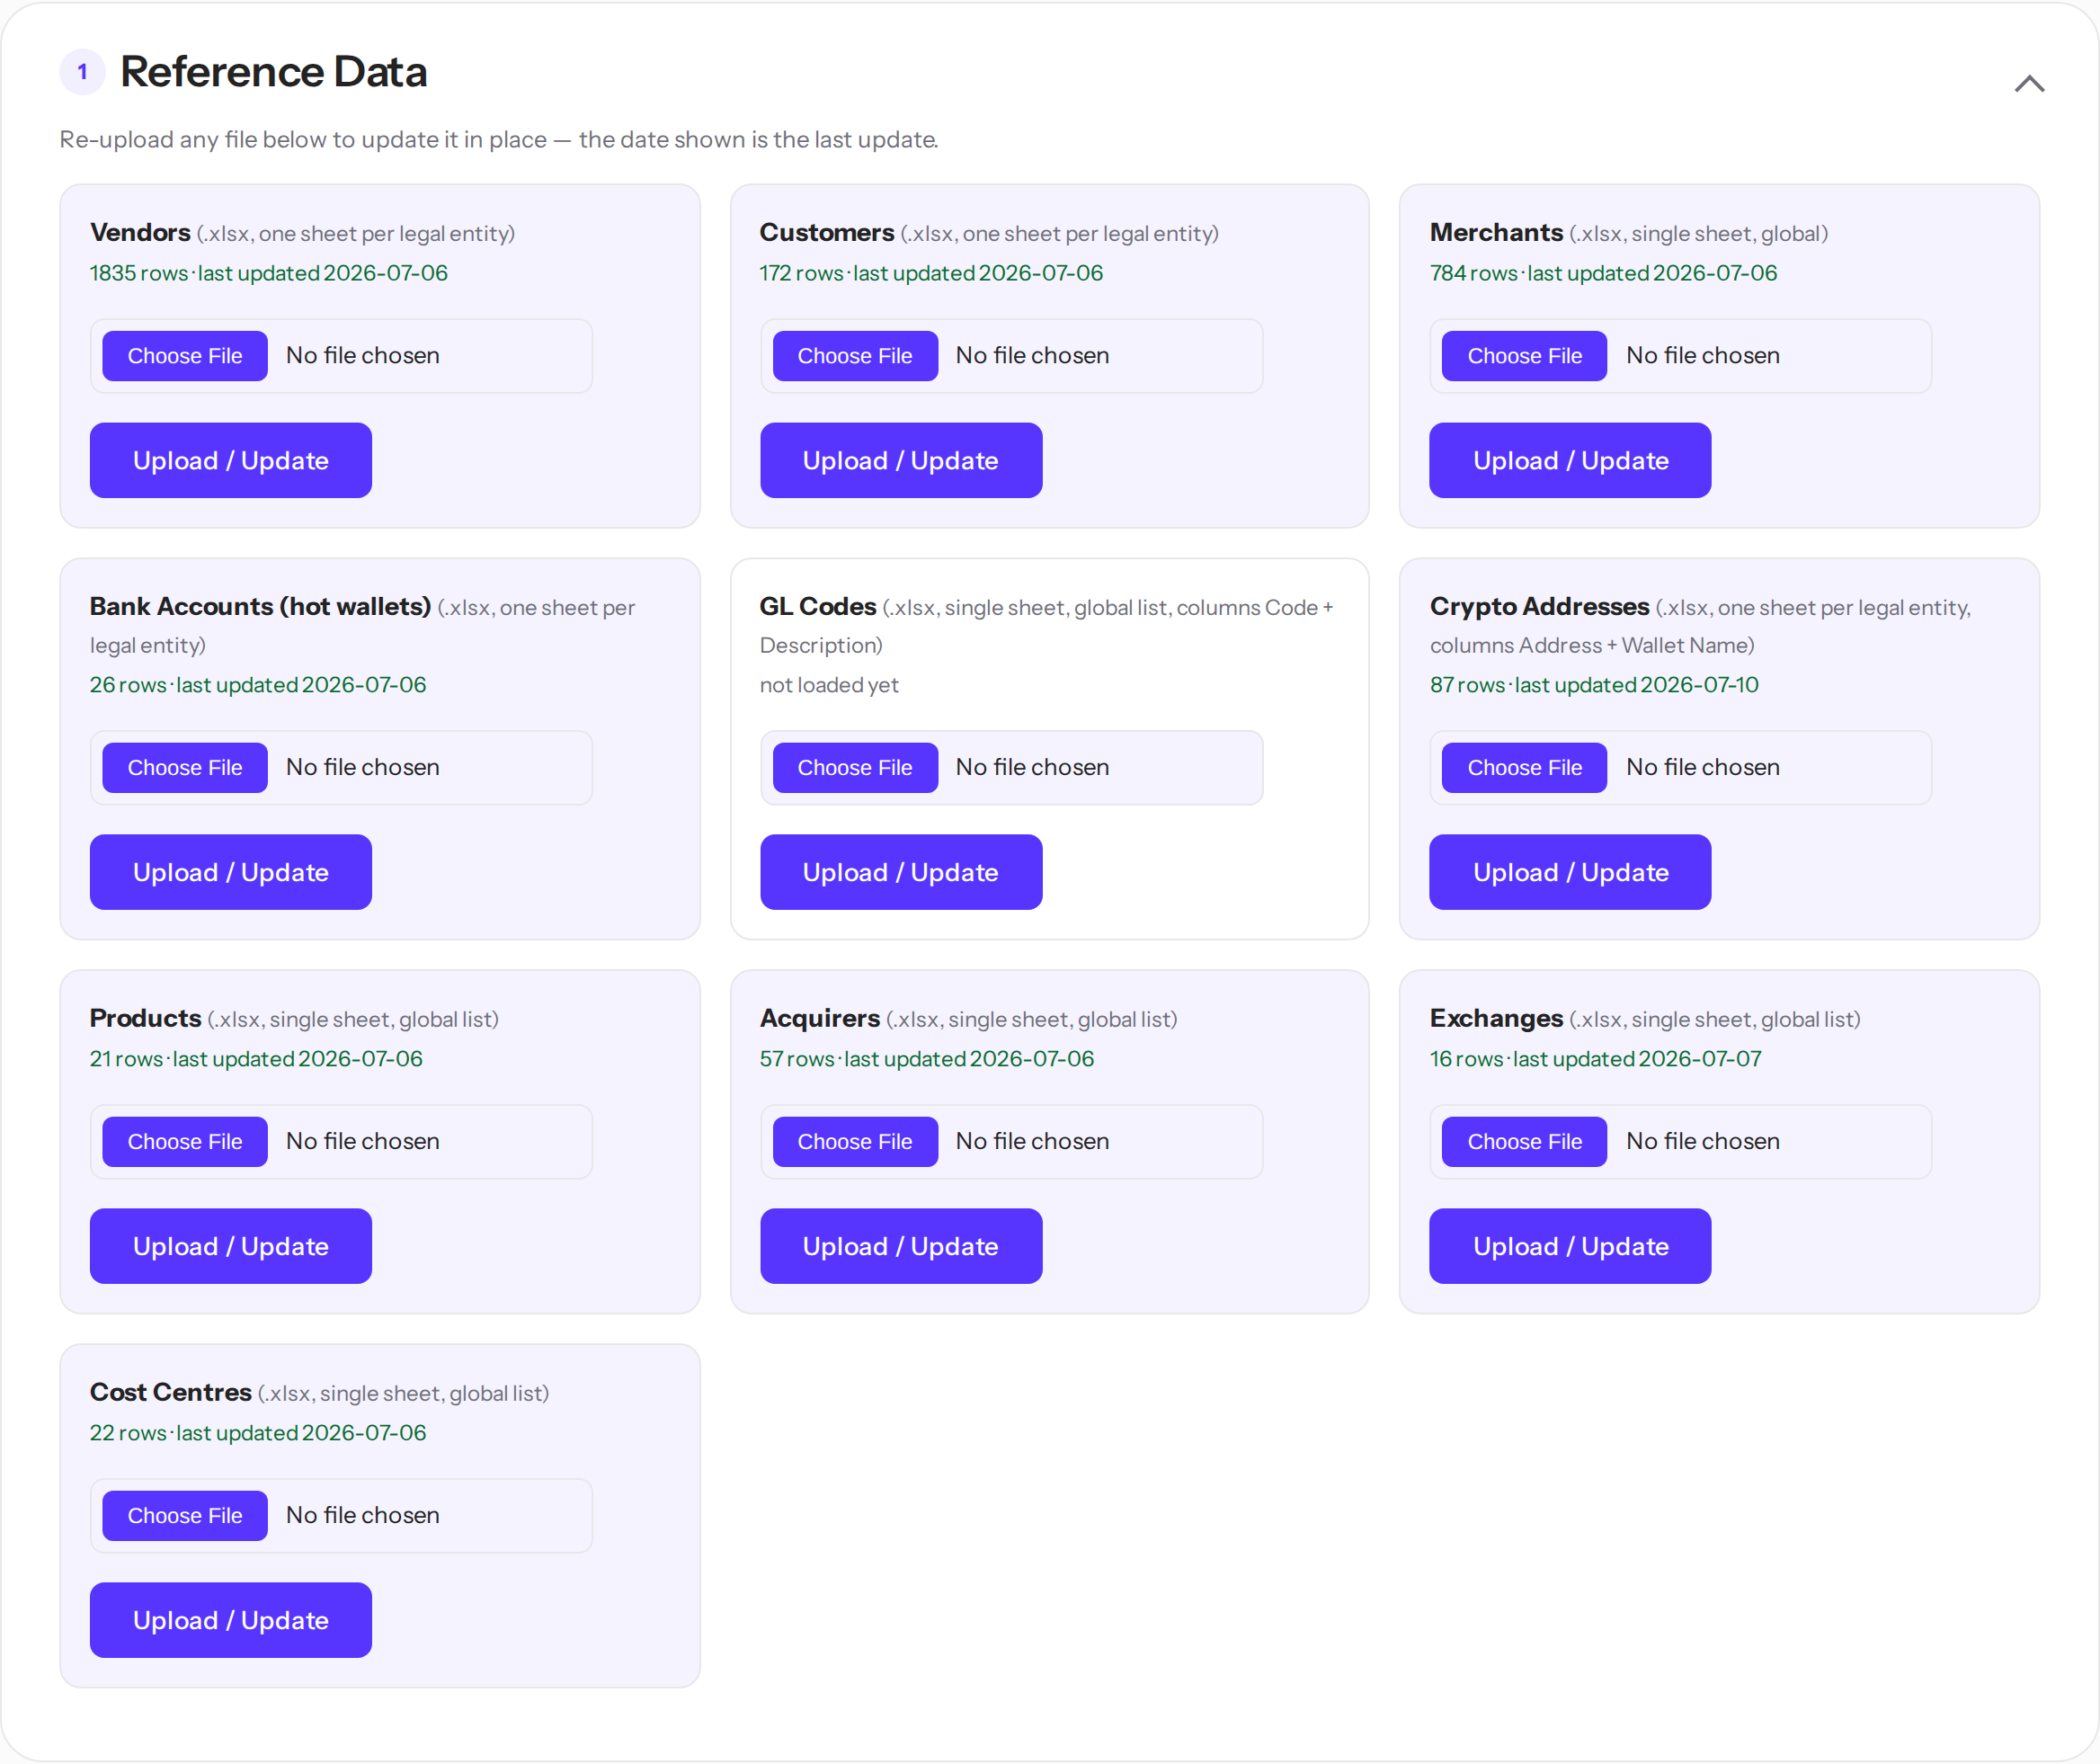
Reference Data holds the dictionaries every statement is matched against. Each list is an .xlsx file that you upload once and refresh whenever it changes in Microsoft Dynamics 365:
- Vendors / Customers — who you pay and who pays you. One sheet per legal entity. Their codes fill the export's Bal. Account No. column.
- Merchants — one global list. Codes fill the Merchant column.
- Bank Accounts (hot wallets) — the entities' own crypto wallets, used to recognise internal transfers.
- GL Codes — the chart of G/L accounts.
- Crypto Addresses — known wallet addresses and their display names.
- Products / Acquirers / Exchanges / Cost Centres — the dimension code lists.
To update a list, upload a fresh file over it. The new file replaces the old contents, and the date next to the list shows when it was last touched. Keep each file in its agreed template — same columns, one sheet per entity where noted.
Tip: Vendors, customers and merchants can carry an Aliases column — alternative spellings, separated by commas. Vendor and customer aliases match as fragments. Merchant names match whole words only, so a short name can't hide inside an unrelated word.
Note: If a list hasn't been refreshed for 3 months, an amber question appears under it. If the list is still accurate, click Yes, keep it — the question goes quiet for the whole team for another 3 months.
Update reference data from Microsoft Dynamics 365
Every list in Reference Data has a source list in Microsoft Dynamics 365. When something changes there, export it and upload it here.
Important: Don't export through Cash Management → Reports. Reports are printable forms — they paginate, truncate long lists and produce PDFs this tool can't read. Use Open in Excel instead, as described below.
Export vendors, customers or bank accounts
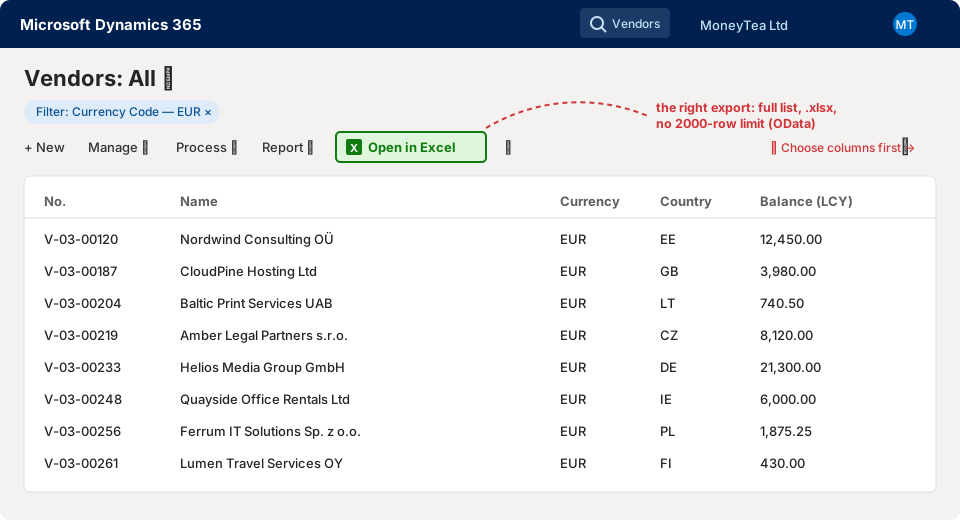
- In Microsoft Dynamics 365, click the search icon (or press Alt+Q) and open Vendors, Customers or Bank Accounts — the list page itself, not a report.
- Click the gear and choose Choose columns. Make sure the columns the template needs are visible — at least the code (No.) and the Name. The export contains exactly the columns the list shows.
- In the list's toolbar, click the Excel icon — Open in Excel. If you don't see it, look in the … menu. The list downloads as .xlsx, complete — this export has no 2000-row limit.
- If you need a slice rather than the whole list, filter the page first — filters carry into the export.
Combine companies into one file
Microsoft Dynamics 365 shows one company at a time, and the Vendors, Customers and Bank Accounts uploads expect one file with a sheet per legal entity.
- Export the list from the first company.
- Switch the company — the badge in the top-right corner, for example "MoneyTea Ltd" — and export again.
- Paste the exports into one workbook, one sheet per entity, and name each sheet after its entity.
Export dimension values: merchants, cost centres, acquirers, products, exchanges
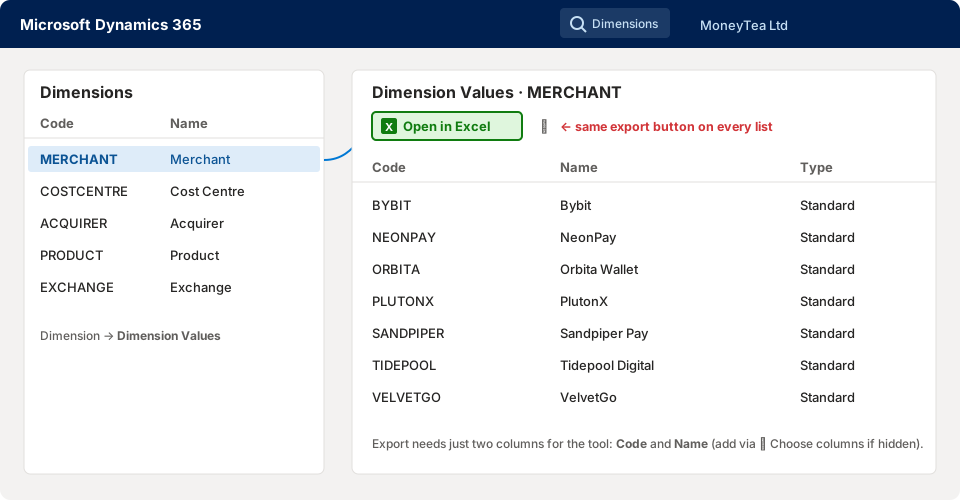
These lists live under Dimensions and are global — one sheet covers all entities.
- Search for Dimensions and open it.
- Select the dimension — MERCHANT, COSTCENTRE, ACQUIRER, PRODUCT or EXCHANGE — then choose Dimension → Dimension Values.
- Click Open in Excel. Two columns are enough: Code and Name.
- Upload the file into the matching slot in Reference Data.
Export the chart of accounts
- Search for Chart of Accounts and open it.
- Click Open in Excel. Keep No. and Name.
- Upload the file as GL Codes.
| Microsoft Dynamics 365 page | Reference Data slot | File shape |
|---|---|---|
| Vendors | Vendors | one sheet per entity |
| Customers | Customers | one sheet per entity |
| Bank Accounts | Bank Accounts | one sheet per entity |
| Dimensions → MERCHANT | Merchants | single sheet |
| Dimensions → COSTCENTRE | Cost Centres | single sheet |
| Dimensions → ACQUIRER | Acquirers | single sheet |
| Dimensions → PRODUCT | Products | single sheet |
| Dimensions → EXCHANGE | Exchanges | single sheet |
| Chart of Accounts | GL Codes | single sheet |
Tip: After you upload a fresh list, open the current statement and click Reapply Rules to run the new names against lines that are already imported.
Bank Accounts
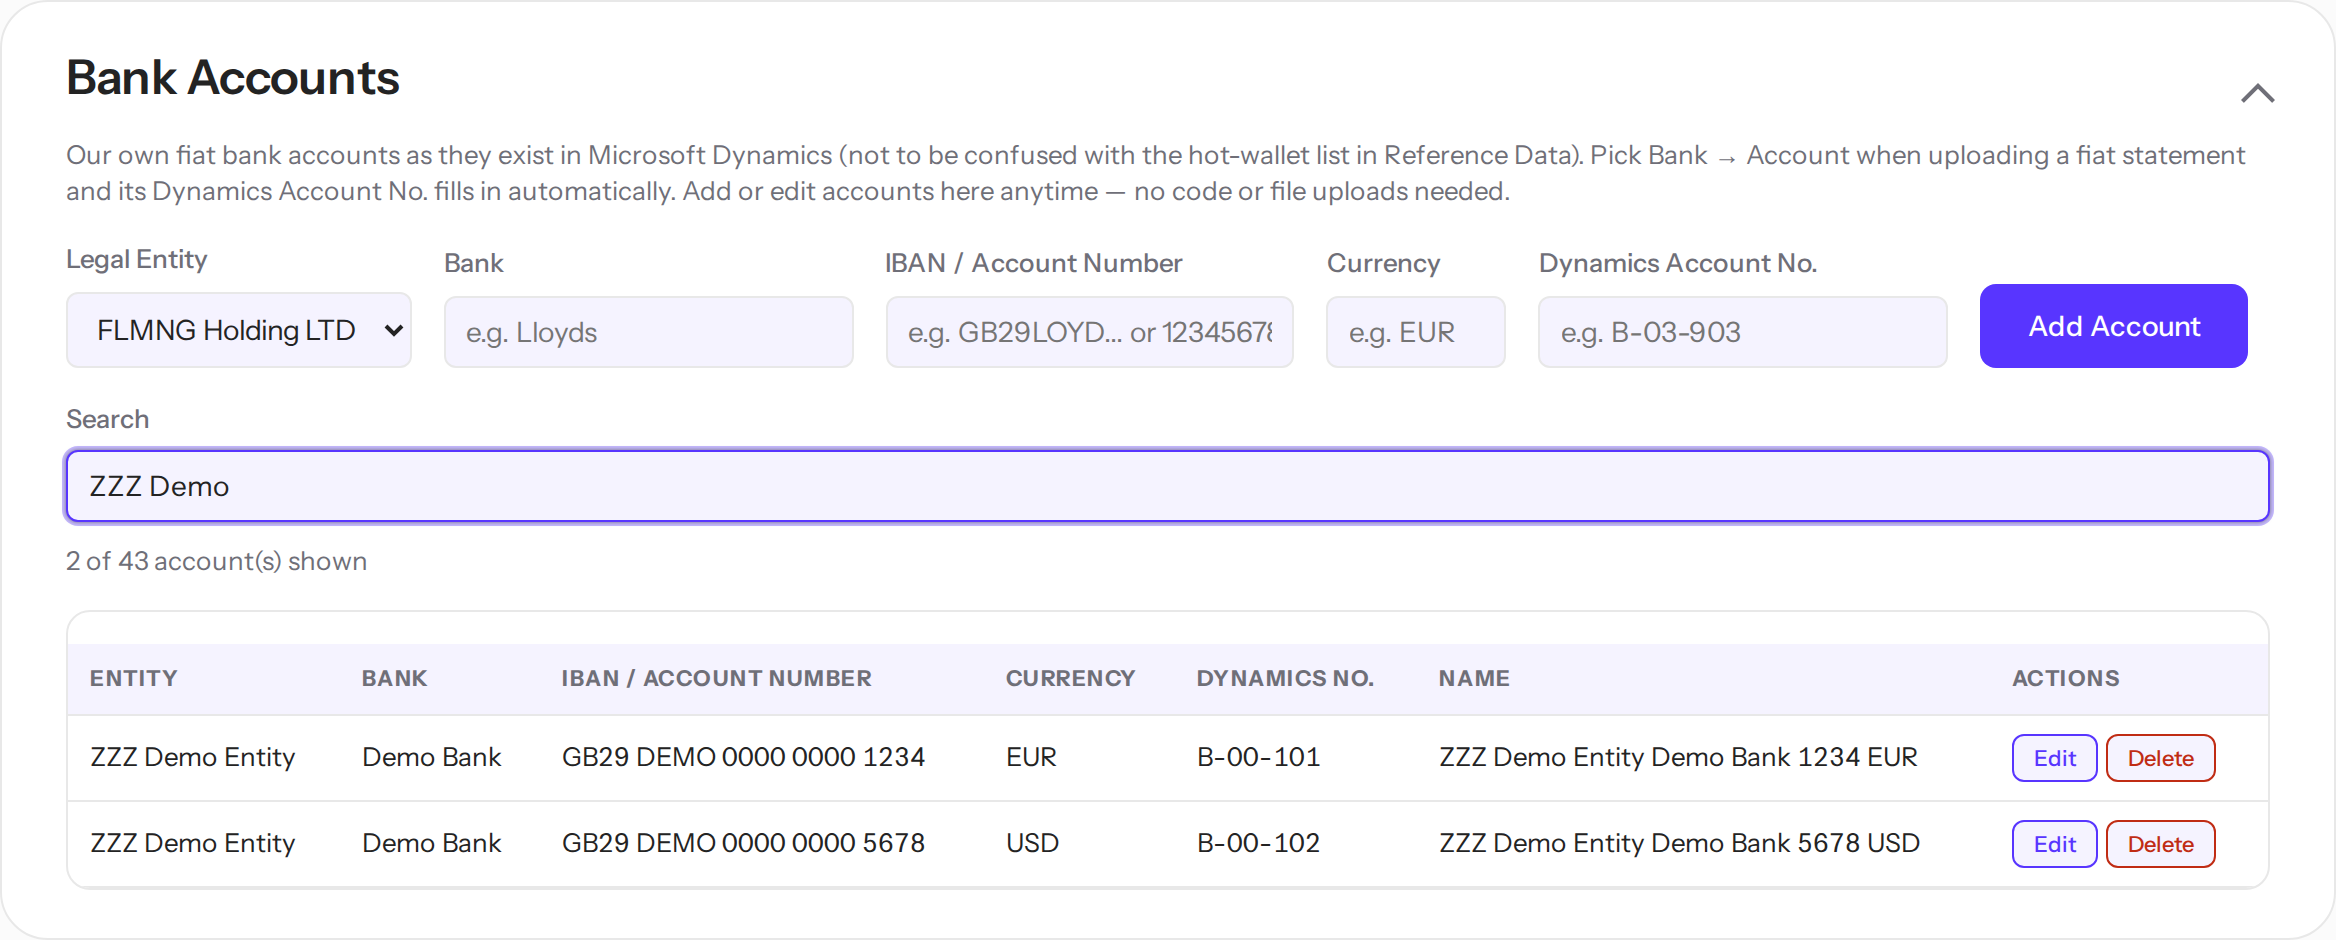
Bank Accounts is the register of the group's own fiat accounts, exactly as they exist in Dynamics. With it, nobody has to open Dynamics just to look up an account code: pick Bank → Account when you upload a statement, and the export's Account No. fills in by itself.
Add an account
- Pick the legal entity.
- Enter the bank, the IBAN or account number, the currency and the Dynamics Account No. (the B-xx-xxx code).
- Click Add Account. The name builds itself: Entity · Bank · last 4 digits · Currency — for example, "MM Lloyds 1234 EUR".
Note: Search filters the table across every column. Edit can move an account to another entity — the name rebuilds itself. Moving or deleting is blocked while uploaded statements still reference the account; this protects statements that are already processed. The full account register sits behind an All accounts toggle so the section opens compact — click it to expand and search.
Bron Bank Accounts (admins)
Below the fiat register, admins manage the Bron custody vaults and their per-wallet Dynamics codes — the Account No. the tool stamps on every Bron row.
- Add a vault under Vaults: its display name (shown in the picker), the File Account Name exactly as it reads in the Bron export, its legal entity and Document No. prefix. It then appears in the New Statement Bron Vault selector — no code change needed.
- Add a code under Codes for each (Vault · Symbol · Network) with its Code MSD and deposit address. Asset Id isn't a field — Symbol + Network already identify the code.
Note: Both lists sit behind All vaults / All codes toggles, same as the fiat register.
Intercompany
With the Intercompany lists, a payment between group companies posts to the partner's intercompany account instead of a vendor. Both lists are editable on the page — no code involved.
Counterparties
Each row is one group entity: the name to look for and the account to post to. Most entities post to their 1-16-0xx account; a few are set up as Vendors — that's an accounting decision, so the type is editable. When a fiat line mentions a group entity, it posts to that entity's account automatically and turns amber for a quick look in Review.
Note: The match deliberately skips three cases: the statement's own entity (its name appears in its own statements constantly), the statement's own bank (the group runs a bank that shares a group name), and lines that mention two different group entities — those wait for you in Review instead of being guessed.
IC journal merchants
This list controls the partner journal sheets in the export. When a statement posts rows to a partner's 1-16 account, the export adds a mirror sheet for that partner — for example, "MM>MT IC". An entry here matches the row's Merchant or its Acquirer (Unlimint, for instance, sits on rows as an acquirer) and decides where its journal rows settle — usually 1-10-104, but any account works, including a Vendor. Fields you leave empty are copied from the original row.
Where a journal row's account comes from, in order: a mapping from this list → the vendor named in the description, looked up in the partner's own vendor list → for a plain transfer with no product/merchant/acquirer, 1-10-300. A row that does carry a merchant, acquirer or product but matches nothing is left with an empty account and a yellow highlight — the tool never guesses an account for it.
If a journal row appears yellow with an empty account, its merchant or acquirer is missing from this list. Add it, then download the export again — no re-upload needed.
Rules — how lines label themselves
A rule says: when a line's description contains this text, label it this way — posting account, counterparty, merchant, product, cost centres. The text is matched anywhere inside the description; wildcards aren't needed.
Every line of every statement goes through the same sequence:
- A rule matches. The line takes everything the rule specifies and turns green. Rules always win.
- No rule, but a known name appears in the description. The counterparty is suggested and the line turns amber — a guess that wants a glance.
- Neither. The line turns red and waits for you in Review.
Create a rule
- From Review — the everyday way. Click Label & make a rule on any line. See the Review section.
- By hand — the Create New Mapping Rule section: pick the entity and type, enter the match text and where it posts.
Note: If your role is user, a new rule waits for an admin's approval before it starts labeling. You'll see it as pending in the Rules list.
Finding a rule in the list
The Rules list is behind a Show rules toggle. Open it and it shows the 20 most recent rules — enough to see what you just added. To reach any other rule, type into Search (it matches the text, the details and the entity) or pick a Legal Entity: the list opens itself and shows every match. This keeps the page fast even with hundreds of rules.
Crypto rules
A crypto description is whatever the exchange happened to print, so crypto rules don't read text. A crypto rule matches on Exchange, Payment Type (DEP/WD), Currency — and one identifying key:
- On most exchanges, the key is the wallet Address from the statement.
- For Kraken and Bron OTC deals, leave Address empty and put the deal's hand-written comment into Wallet Name — the comment identifies the deal better than the address. See the Bron section for details.
- Scrypt has no addresses at all. The field becomes Wallet Name: enter any text that reliably identifies the wallet.
Note — Kraken deposits: the tool resolves the real sender of every uncommented deposit from its transaction hash (via the blockchain explorer) and applies address rules to that sender. The description, however, always shows the address the deposit arrived at — the raw file's INFO column — never the sender.
Note: A crypto rule fires only on its own exchange, and crypto rules never affect fiat statements.
Write match text that lasts
Cut the text down to the part that never changes. Drop invoice numbers, dates and references; keep the wording that repeats. "ACME PROCESSING settlement" is a good rule. "ACME PROCESSING settlement w19 inv 2210-A" will match once and never again.
The Rules section lists every rule in force — searchable, filterable by entity. Edit loads a rule back into the form; Copy loads it as a new rule — change the one thing that differs (a code, the match text) and Save, instead of re-typing a near-identical rule from scratch.
Upload a statement
Upload a fiat statement
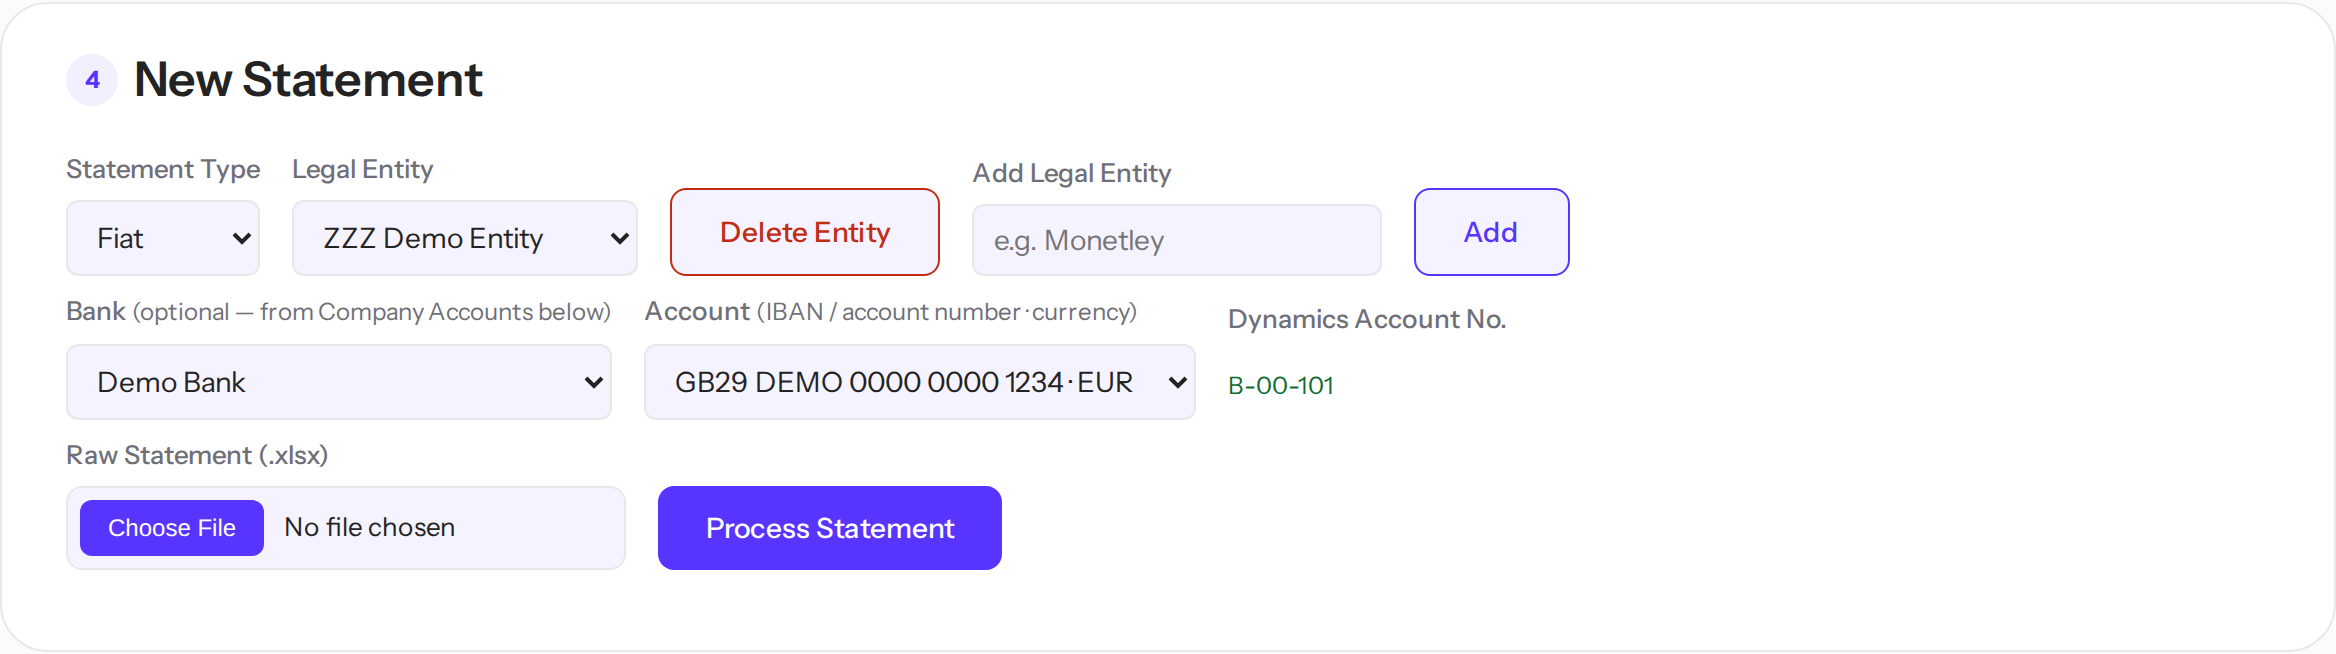
- Set Statement Type to Fiat and pick the legal entity.
- Pick Bank → Account. The Dynamics code that will go into the export shows next to it in green. Skipping this leaves Account No. empty in the export.
- Choose the file and click Process Statement.
The format is detected automatically — the parser finds the transaction table by its column headers, in several spellings and languages. If the file has several sheets, each sheet becomes its own statement; name the sheet tabs after the Bank Account names, and each sheet links to its account by itself.
Details the parser handles for you:
- .xlsx and .csv both work. Reference files stay .xlsx.
- PDF works for Anna Bank accounts only — the one bank without a spreadsheet export. A PDF against any other account is rejected as a probable mistake.
- Revolut: a row's fee becomes its own "FEE …" line, already labelled — it arrives green. Only COMPLETED rows import.
- Alfa Bank: zero-amount revaluation rows are skipped — on Alfa accounts only.
- Opening and closing balance lines never import. Dates read day-first everywhere except MDream, whose header declares MM/DD.
- A new bank with a plain table can be taught without code: Statements Format Management → Fiat bank formats.
Upload a crypto statement
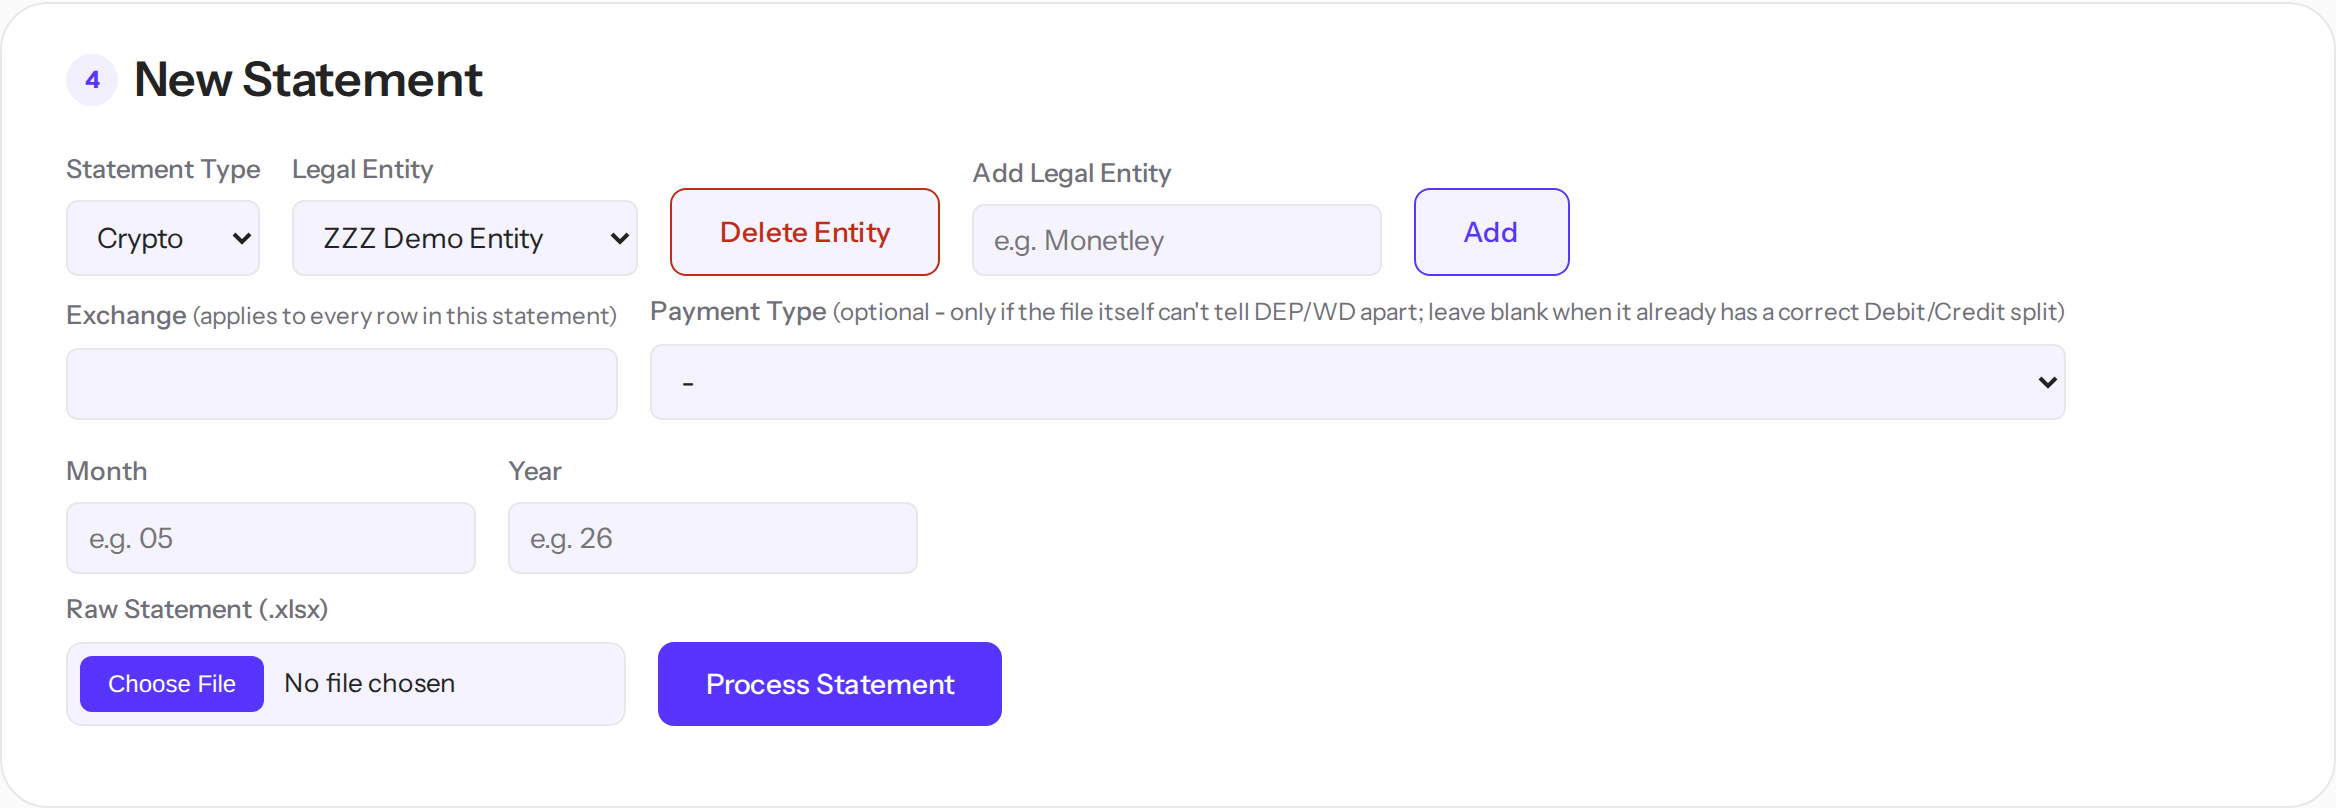
- Set Statement Type to Crypto, pick the legal entity and the Exchange.
- Set Payment Type (DEP or WD) only if the file can't tell deposits from withdrawals — Kraken, for example. Otherwise leave it blank.
- Set Month/Year — the reporting period that goes into the Document No., such as "HTX WD 0726". Kraken builds its Document No. from REFIDs and doesn't need them.
Note: Cancelled, Rejected and Failed rows (Scrypt, Kraken and any exchange with a Status column) are dropped on import — the transaction never settled, so it never reaches Dynamics. The count shows in Check File and in the upload result, so you can see exactly how many were removed.
Check a file before uploading
Click Check File next to the upload button. It runs the full parser without importing anything and reports what it saw: which columns it recognised, how many rows parsed, what would be skipped and why. For Bron files it also counts the spam it would remove and lists missing B-codes. For a PDF it shows a masked preview — digits become 9, letters become x — so a broken file can be debugged without its contents going anywhere.
Tip: When a bank changes its export format, run Check File first and upload second.
Bron (custody) statements
Bron is the group's custody platform. Its export is built from events — a transfer and its network fee arrive as separate rows — so the tool parses it with a dedicated parser and does most of the old hand-work automatically.
Upload a Bron statement
- Set Statement Type to Crypto and the Exchange to BRON.
- Pick the Bron Vault this file belongs to (one file = one vault). The list shows the chosen legal entity's vaults — for example Bron MoneyPaprika, Bron Blik, Bron MoneyMaple, Bron MoneyMaple for OTC. The pick decides which vault's Account No. codes apply, so a same-named vault of another company can never leak in. If the file's own account name doesn't match your pick, the upload is rejected — a guard against uploading the wrong file.
- Set Month/Year.
- Leave Payment Type empty — every Bron row knows its own direction.
What labels itself
- Network fees post to 6-01-110 (ON / OFF RAMPS) and arrive green.
- Transfers between the group's own vaults post to 1-10-201 with the comment SWAP — in any currency.
- Canton rewards post to 5-01-160, currency CC.
- Every row receives its own Account No. — the vault's B-code for that asset and network, taken from the vault you picked (its mapping lives in Bron accounts in Statements Format Management). If a combination is missing, the Account No. stays empty, and Check File names the exact pairs to add.
- Document No. and Description build themselves: "BRON OTC DEP0726", "BRON WD - USDT <address> #<hash>". The description address follows one rule: a deposit or withdrawal shows the address it went to; a network fee shows the paying vault's address; a swap leg shows the vault's address on the network the swapped funds arrived on.
- The Amount column (the row's comment) never sits empty on a row that can explain itself: a network fee reads "network fee", and a row a rule labelled carries that rule's name (its comment text, or the address's Wallet Name).
How spam is cleaned up
Custody wallets attract on-chain dust and scams. The import removes what is certainly noise and flags what needs your judgement:
- Rows worth exactly $0 never import.
- An incoming deposit under $1.5 imports flagged SPAM?. The tool never labels these; you decide. Withdrawals are never flagged as spam — money we send out can't be dust.
- A dust deposit from a look-alike address — one that copies the first and last characters of an address the tool knows — is removed. That's the address-poisoning scam.
- Bron's own Risk verdict is honoured: a "danger" row under $5 is removed. A danger row worth $5 or more stays, flagged DANGER!, and waits for you.
Note: Every removed row is counted in the upload summary and in Check File, and the export's Raw Statement tab keeps the untouched original. Nothing disappears silently.
Label OTC deals with your notes
Deposits are recognised by the sender's address, withdrawals by the destination — so ordinary address rules work on Bron. The OTC vaults are different: one address serves several terminals, and the address alone can't tell the deals apart. Your notes can.
- Before uploading, write the deal's note into the raw file's Notes column. It becomes the row's comment.
- Upload the statement.
- Create the rule the same way as for Kraken OTC: leave Address empty and type the note's text into Wallet Name. Exchange, direction and currency apply as usual.
Note: The counterparty's Address Book name travels along as the row's comment and is searched against Vendors and Customers — matches arrive amber. When money arrives from an address you only ever send to, the comment says "known address …" — usually a refund.
Review & Label
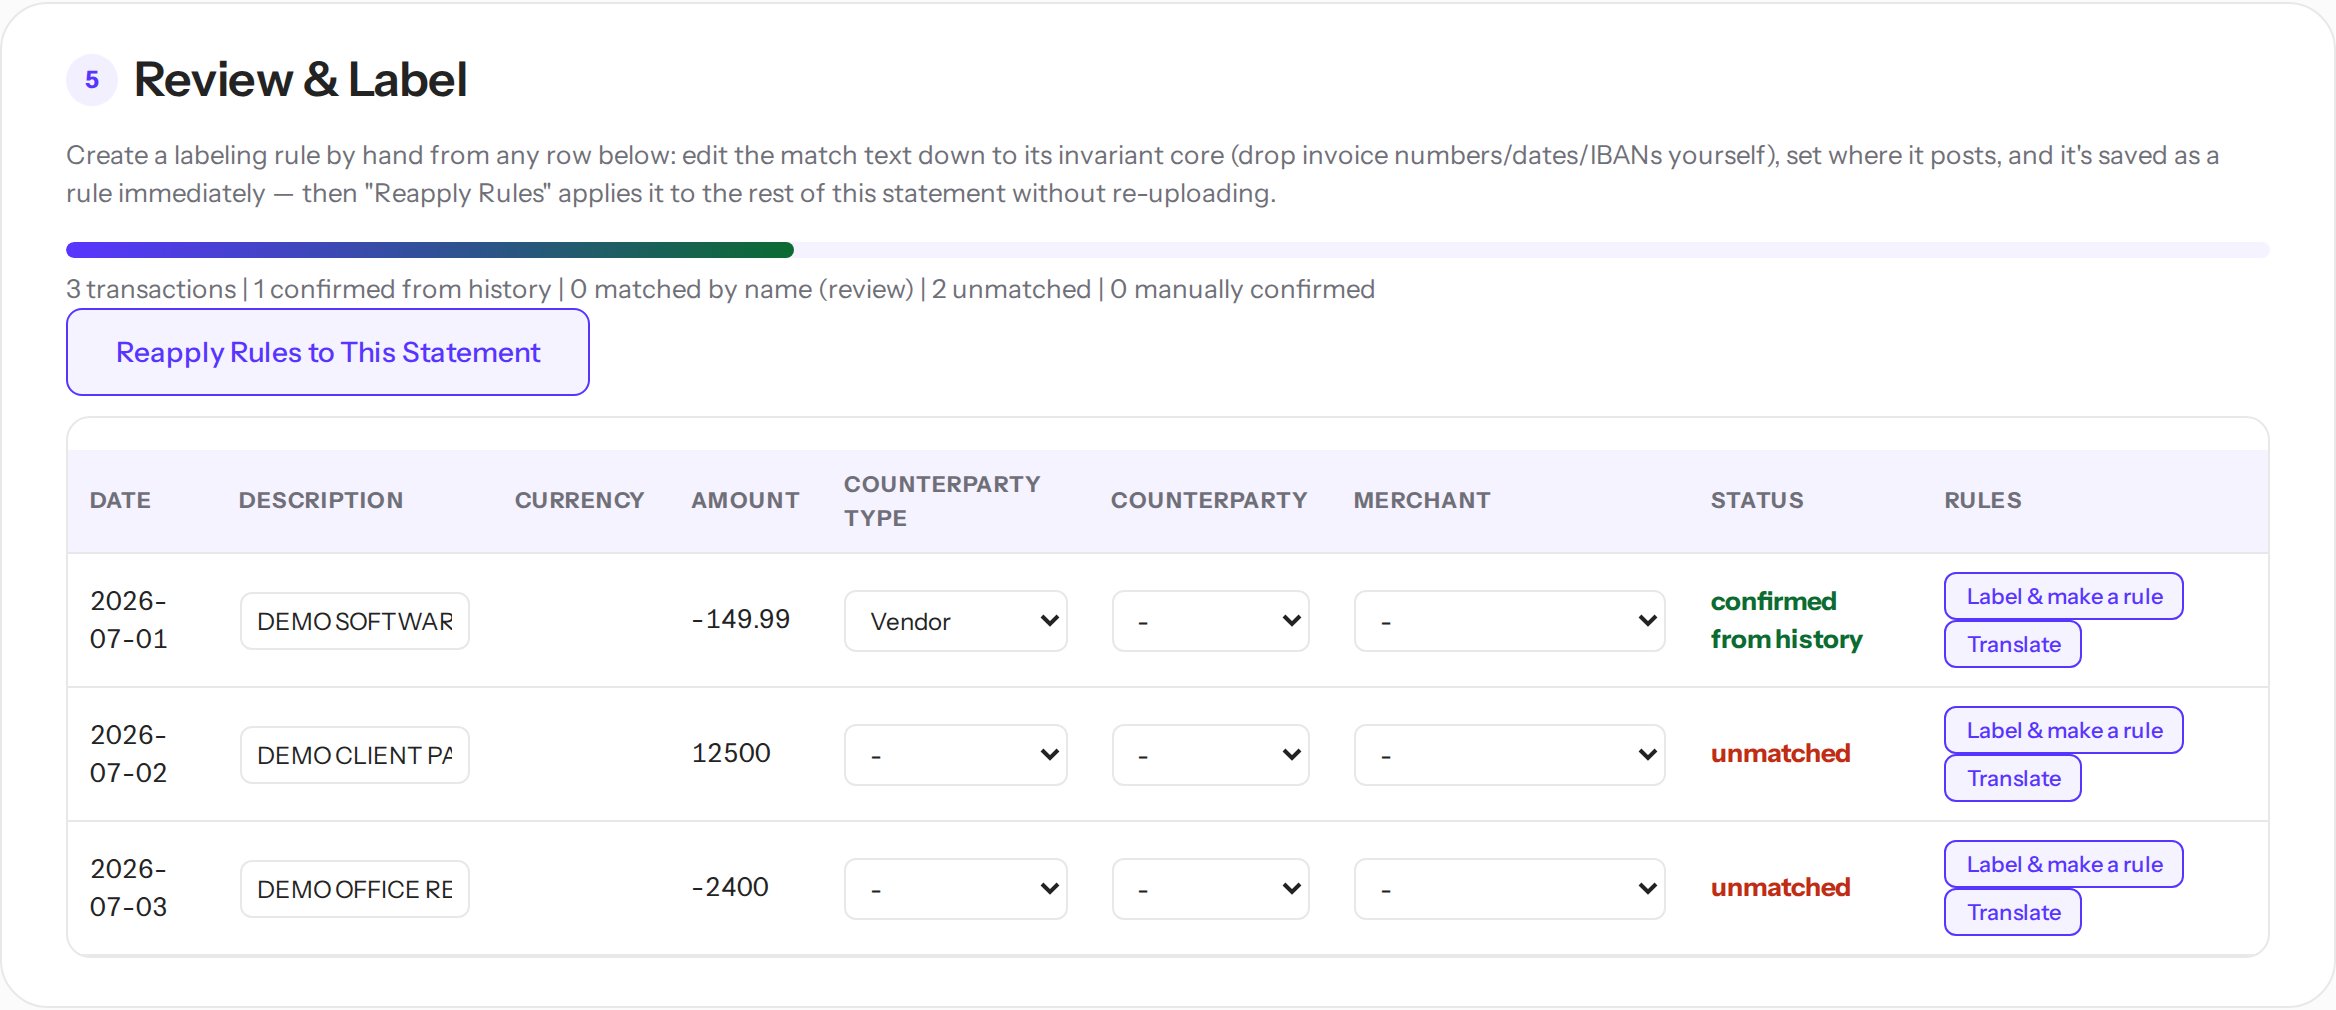
After processing — or after clicking Review on a statement in Uploaded Statements — you land here. The progress bar shows how much of the statement resolved itself. Each line carries a status:
| Status | Meaning | What to do |
|---|---|---|
| confirmed from history | A rule matched. | Nothing. |
| matched by name | A known name was found in the description — a guess. | Check it; fix if wrong. |
| unmatched | Nothing recognised the line. | Label it. |
| confirmed | A person confirmed the line. | Done. |
Note: If the import removed any rows that never settled or look like spam — a cancelled, failed or rejected transaction, a zero-value row, or an address-poisoning look-alike — the summary shows a red ⚠ N dropped count at the end. Those rows are not in the table and are never exported; hover the count to see why they were removed.
Every cell is editable in place. The Counterparty and Merchant fields are searchable — start typing to filter the list, or scroll it as before. For a payment that repeats, don't fix cells by hand — make a rule instead:
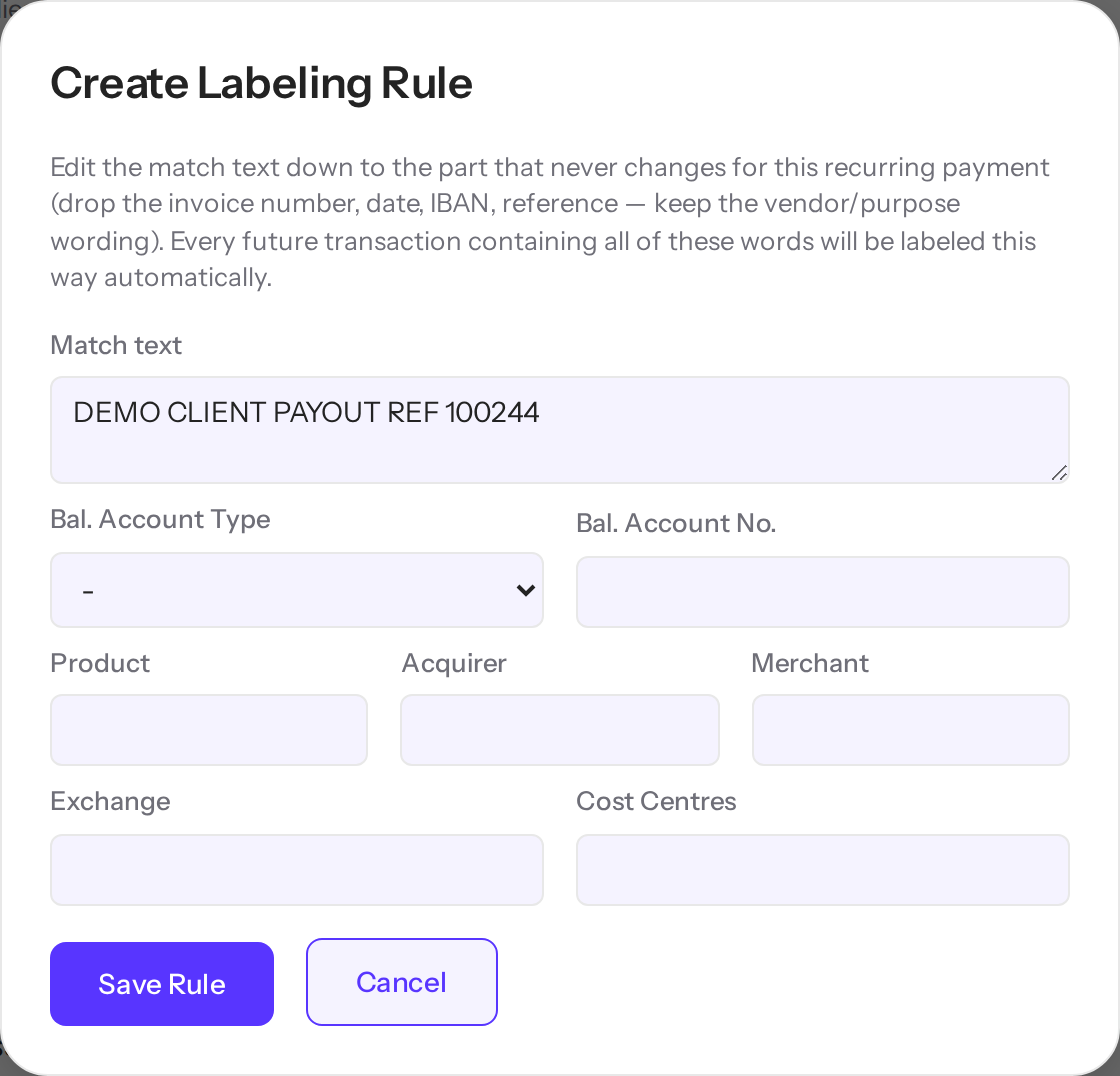
Label a line and make a rule
- Click Label & make a rule on the line. The dialog opens with the line's description filled in.
- Trim the match text down to its unchanging core — drop the invoice number, the date, the reference.
- Set where the line posts: Bal. Account, Posting Type, Product, Merchant, Cost Centres — whatever applies.
- Save. The line is labelled, and the rule now exists for every future statement.
- Click Reapply Rules to This Statement. The new rule labels every other matching line right away — no re-upload needed.
The Translate button saves a description-translation rule instead — for
statements whose wording needs a fixed rewrite, such as standard Russian fee phrases.
Translate rules accept * wildcards for the changing middle:
"за период с * по *" becomes "for the period from $1 to $2", and Russian month names turn
into English on their own.
Comment markers
Some lines arrive with a marker in the comment — it also shows in the export's Amount column:
| Marker | Meaning |
|---|---|
| SPAM? | An incoming crypto deposit under $1.5 — probably dust. You decide. Withdrawals are never flagged. |
| DANGER! | Bron's risk engine flagged the sender. The money moved, so the row stays — label it yourself. |
| POISON? | The address imitates one the tool knows. On exchanges other than Bron this is a warning only. |
| SWAP | A transfer between the group's own vaults. Already labelled. |
| known address: … | No rule matched, but the address is known from the opposite direction — usually a refund. |
| vendor in <entity>: … (No.) | Bron only: the counterparty looks like a vendor of another group company. A hint with its vendor number — the row stays unmatched; you decide. |
Note: A line carries a Merchant or an Acquirer — never both. If a merchant won't save, an Acquirer is already on the line.
Note: A vendor line's Posting Type is set by the money direction, not by the rule — money out to a vendor is PAYMENT, money in from a vendor (a refund) is REFUND. So a single PAYMENT rule per vendor is enough: the tool flips it to REFUND by itself on an incoming line — you don't need separate refund rules. (A rule that sets some other Posting Type is left as-is.)
Export

Download for Dynamics 365 produces the finished workbook: the fixed 25 columns in the exact order Dynamics expects, colour-grouped headers, frozen header row, capitalised account types, 2 decimals for fiat and 5 for crypto.
- Lines that still need attention are highlighted yellow — nothing slips into Dynamics unnoticed.
- An OTC settlement with an empty Exchange cell is highlighted amber — fill it in before uploading.
- Rows posted to a partner entity's 1-16 account add a mirror journal sheet per partner, such as "MM>MT IC" — laid out the way the partner's books expect. The Intercompany merchant list decides where those rows settle. A partner 1-16 row with no vendor or contentful signal still appears on the journal sheet — everything filled in except Bal. Account Type and No., which are left blank and highlighted for you to complete (the tool won't guess them). The same rows are highlighted amber in Review and the Export area shows a count. Label a vendor or product on the row and it fills in fully.
- Past the fixed 25 columns, some exchanges add a 26th helper column: Kraken exports carry Full Document No. (Document No. itself is capped at 18 characters for Dynamics), and Bron exports carry Address — the address shown in each row's description, on its own for easy checking.
- If the import removed any never-settled or spam rows, a red "Dropped" tab lists them — date, amount, currency, the reason (cancelled/failed/rejected, USD 0, look-alike or risk-flagged), and a short description. The tab appears only when there is something to show, and these rows are never part of the Upload sheet.
- The final tab, always named Raw Statement, is an exact copy of the uploaded file — for checking the result against the source. On a crypto statement, any rows the import treated as spam/noise (SPAM? suspects, USD 0, address-poisoning, risk-flagged) are tinted very light red there, so you can filter them out and check the rest of the statement clean. Statements uploaded before this feature appeared don't have the tab until re-uploaded.
- You can export at any point; the highlighting reflects whatever is still open.
Uploaded Statements
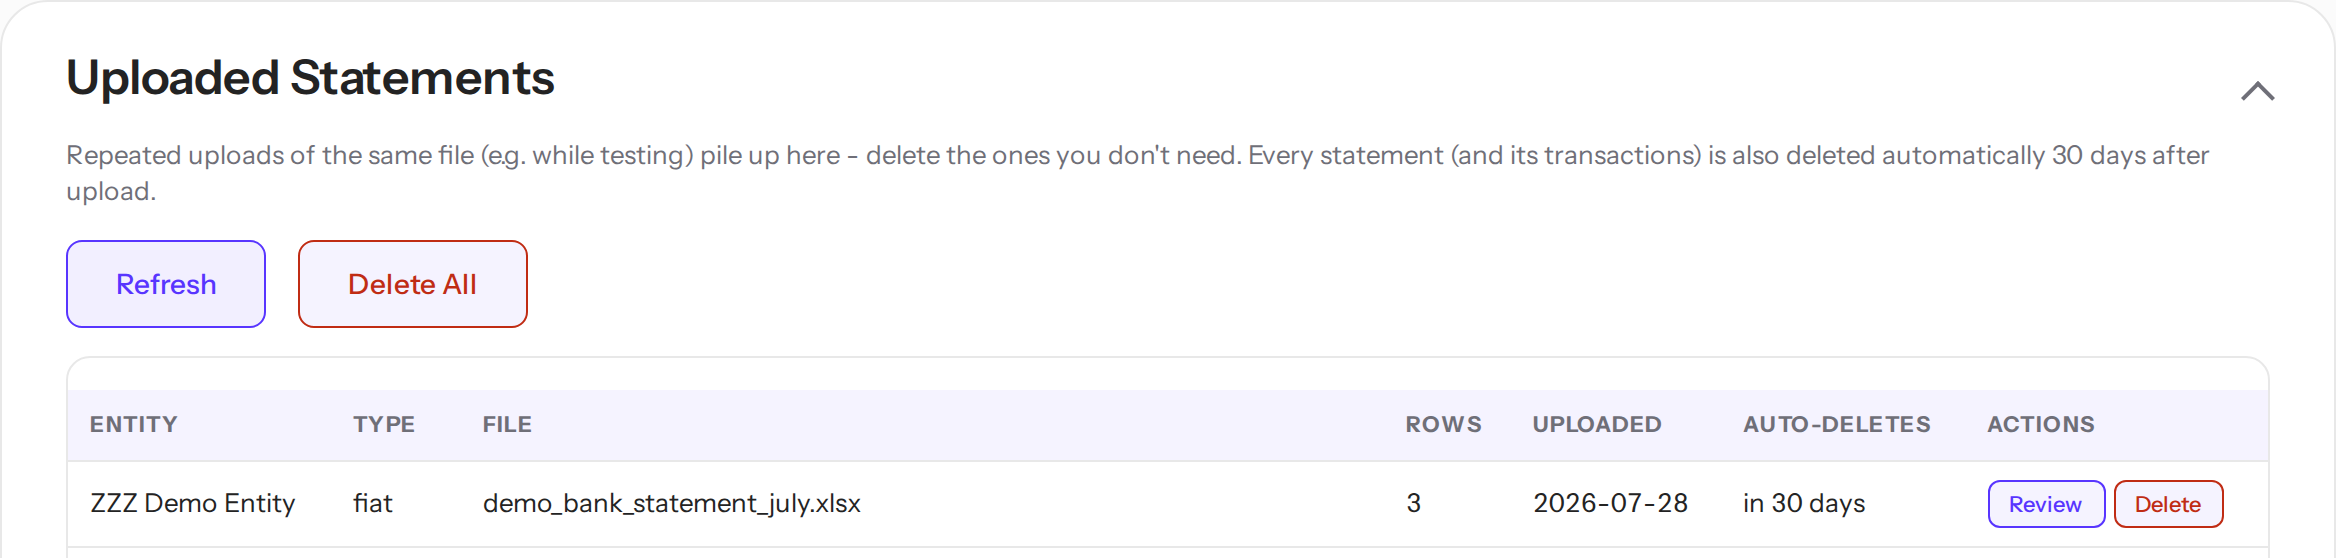
Every upload lands here — across all users — with its entity, type, row count and an auto-delete countdown. Reopen any statement for review, or delete the ones you no longer need.
Important: Statements delete themselves 30 days after upload, together with their transactions. The countdown turns amber under 3 days. This is by design: the tool is a processing station, not an archive — source files live in the banks, results live in Dynamics. Rules, reference data and bank accounts are never auto-deleted.
Delete and Delete All ask for a 5-second timed confirmation. Deletion is permanent.
Admin
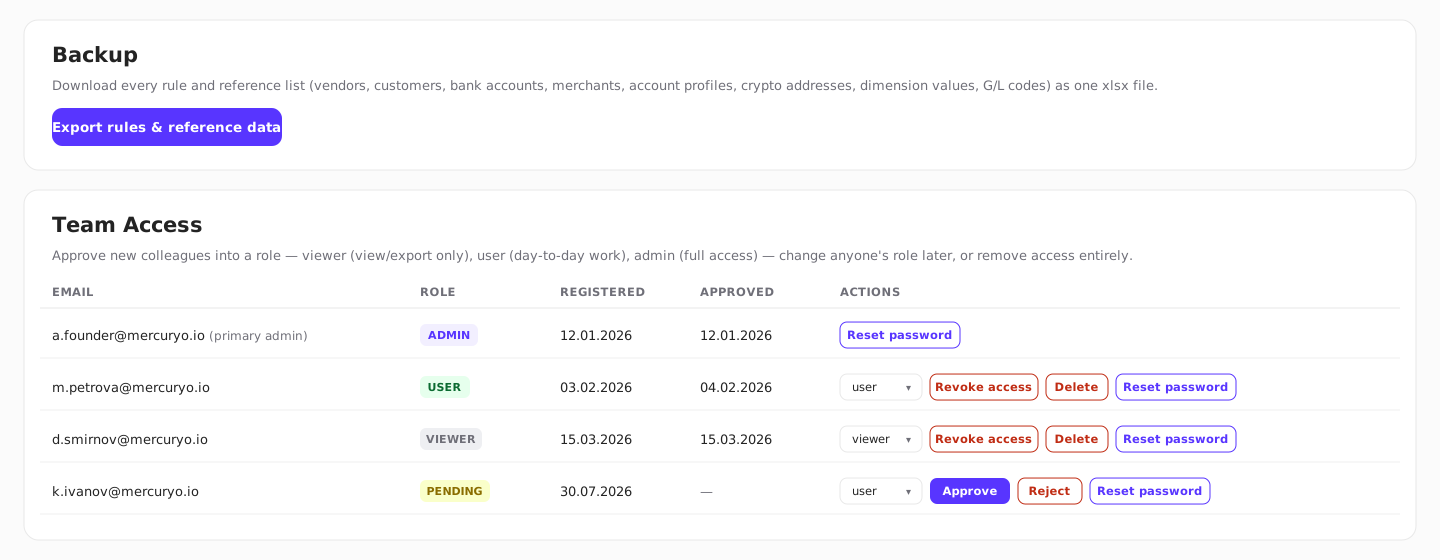
Backup — downloads every rule and reference list as one .xlsx. Do this regularly; it's the team's insurance copy of everything that isn't auto-deleted.
Team Access — everyone who has ever registered, with their role and status. From this table you can:
- Approve a newcomer. A fresh registration arrives as pending: pick the role in the dropdown next to it and click Approve — or Reject to remove the registration. A red dot appears on the Admin Panel button whenever registrations are waiting, so a new request isn't missed.
- Change a role. Pick a new role in the dropdown; the change applies after you confirm it.
- Revoke access. The person is logged out and can't sign in until re-approved. Their account and history stay.
- Delete. Removes the account permanently — they'd have to register again from scratch.
- Reset a password. Available for every account, including your own.
Note: Only the primary admin can grant or revoke the admin role. Destructive actions ask for a 5-second timed confirmation.
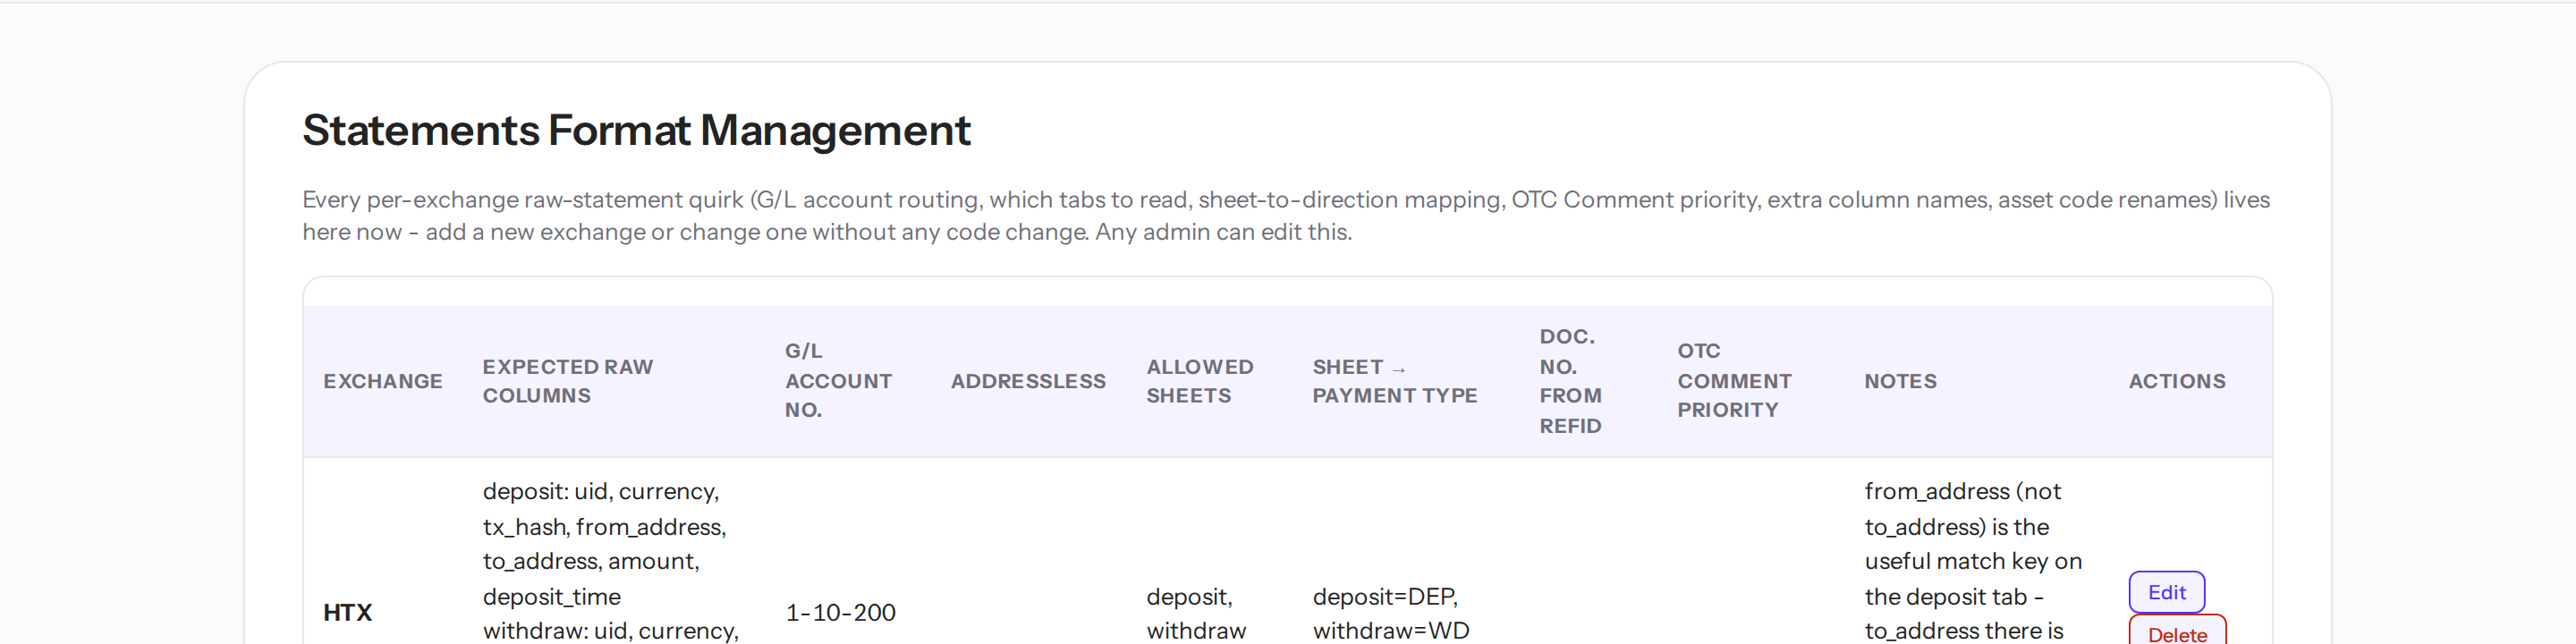
Statements Format Management — how each raw format is parsed. Three parts:
- Statement Formats — per-exchange settings: expected columns, which sheets to read, sheet-to-direction mapping, G/L routing, asset renames. A new exchange is a new row here, not a code change.
- Fiat bank formats — teach a new bank's plain table: which headers mean the date, the description and the amounts, plus row rules. Banks built into the code show as greyed built-in rows in the same table.
- Bron accounts — the custody vaults: each vault's legal entity, its Document No. prefix and the B-code for every asset and network it holds. A file uploaded under the wrong entity is rejected.
Troubleshooting
| Symptom | What to do |
|---|---|
| "Could not recognise a transaction table in this file" | The parser didn't find a header row it knows — usually a new bank with new column names. Send the file's column headers to whoever maintains the tool; teaching it takes minutes. |
| A line got the wrong counterparty | That's an amber name guess — a known name happened to appear in the description. Fix the cell, or make a rule; rules always override guesses. |
| A new rule doesn't label anything | If your role is user, the rule may still be pending approval. Also check the match text isn't over-specific, and click Reapply Rules on the open statement. |
| Account No. is empty in the export | No Bank Account was picked at upload. Add the account, then upload the statement again with Bank → Account selected. |
| A statement disappeared | Statements auto-delete 30 days after upload. Re-upload from the source file if needed. |
| Can't delete or move a Bank Account | Uploaded statements still reference it. Delete those statements or wait out their 30-day retention. |
| A crypto statement has fewer rows than the raw file | The import removed rows that never settled or are spam — Cancelled/Failed/Rejected, $0 rows, poisoning twins, danger dust. The Review summary shows a red ⚠ N dropped count, the export's Dropped tab lists each removed row with its reason, and the Raw Statement tab keeps every original row (spam tinted light red). |
| Can't set a Merchant on a line | The line already carries an Acquirer, and a line carries only one of the two. Clear the Acquirer, or fix the rule that sets it. |
| A Bron export shows empty Account No. on some rows | The vault is missing a B-code for that asset and network. Check File names the missing pairs; add them in Bron Bank Accounts and download the export again. |
| "This file is for vault X, but you picked Y" on a Bron upload | The file's own account name doesn't match the vault you picked in Bron Vault. Check which month/vault the file actually is, pick the matching vault (or the right legal entity), and upload again. |
| An export is missing a new feature (Address column, Dropped tab, spam highlight, rebuilt descriptions) | Those are built at import, so statements uploaded before the feature appeared don't have them. Re-upload the statement — rules re-apply automatically, so nothing is lost. Anything built at export (IC journals, Document No. truncation) only needs a fresh download. |
| The Rules list shows only 20 rules | By design: the 20 most recent are shown. Type into Search or pick a Legal Entity — the list opens itself and shows every match. |
| "Too many attempts" at login | 10 failed logins in 15 minutes lock the pair of your address and email. Wait out the timer shown and try again — a successful login clears the counter. |
| A PDF statement is rejected | Only ANNA bank statements are accepted as PDF (it's the one bank with no xlsx/csv export). For any other bank, download the xlsx or csv version. |
| An upload fails with "file too large" | Uploads are capped at 50 MB. Export a shorter period from the bank/exchange and upload it in parts. |
| An IC journal row is yellow with an empty account | Its merchant or acquirer isn't in the IC journal merchants list (or the vendor has no code in the partner's books). Add the mapping, then download the export again — no re-upload needed. |
| A row is highlighted light-yellow and its tooltip says "Rule conflict" | Two or more equally-specific rules matched that row but set different values, so the tool applied one of them arbitrarily. Hover the row to see which rules and which field disagree, then fix or delete the losing rule. Rules that agree are never flagged. The same light-yellow tint and a cell note appear in the exported Upload sheet. |
| An Unlimit bank charge went to 7-06-100 instead of my charge rule's account | This is deliberate. When a bank fee's description ends with the Reference number of a payment from the same statement and that payment is matched to a Vendor, or is a salary/tax payment on a G/L account starting with 2-, the fee is that payment's bank charge and is posted to 7-06-100 with Cost Centre FINANCE and an empty Product — overriding any charge rule. A charge tied to any other row, or with no matching payment in the file, keeps its ordinary rule label. |
Note: Anything not covered here — ask the tool's maintainer. This guide grows together with the tool.